
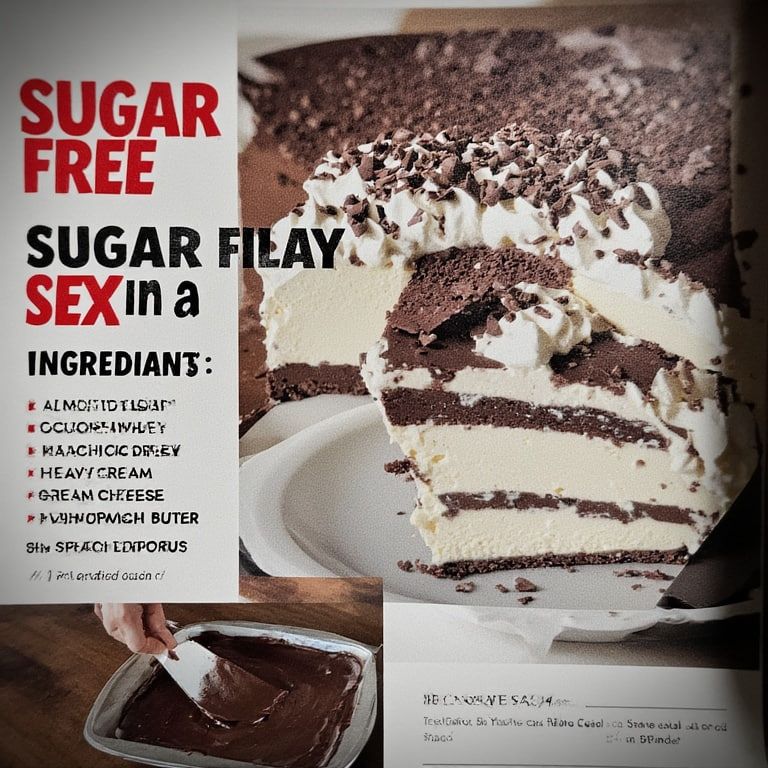
For the Chocolate Almond Crust:
1½ cups superfine blanched almond flour
3 tablespoons unsweetened cocoa powder (premium quality recommended)
¼ cup powdered sugar-free sweetener (monk fruit or erythritol)
¼ cup unsalted butter, melted
1 tablespoon pure vanilla extract
Pinch of salt
For the Sugar-Free Chocolate Pudding:
2 cups heavy whipping cream (full-fat)
1½ teaspoons unflavored gelatin powder
⅓ cup powdered sugar-free sweetener
¼ cup unsweetened cocoa powder
1 teaspoon vanilla extract
¼ teaspoon salt
For the Cream Cheese Layer:
8 ounces full-fat cream cheese, softened
⅓ cup powdered sugar-free sweetener
1 teaspoon vanilla extract
½ cup heavy whipping cream, room temperature
For the Whipped Cream Topping:
1 cup cold heavy whipping cream
3 tablespoons powdered sugar-free sweetener
1 teaspoon vanilla extract
Optional Garnishes:
Sugar-free chocolate shavings
Unsweetened cocoa powder for dusting
Fresh berries (if carb count allows)
Chopped nuts
Detailed Step-by-Step Instructions
Preparing the Chocolate Crust
Set Up – Position your oven rack in the center and preheat to 320°F (160°C). Line a 9×9-inch square baking pan with parchment paper, leaving overhang on two sides for easy removal later.
Mix Dry Ingredients – In a large bowl, whisk together almond flour, cocoa powder, powdered sweetener, and salt until completely uniform with no lumps remaining. Sifting the almond flour beforehand removes any clumps and ensures smooth texture.
Add Wet Ingredients – Melt the butter in a microwave-safe bowl, then pour over the dry mixture. Add vanilla extract and stir with a silicone spatula until you achieve a sandy, crumbly consistency. Every particle should be moistened with butter.
Press and Bake – Transfer this mixture to your prepared pan and press firmly into an even layer covering the entire bottom. Use the bottom of a measuring cup or glass to compact it thoroughly. Bake for exactly 15 minutes, then remove and cool completely on a wire rack.
Creating the Chocolate Pudding Layer
Bloom the Gelatin – In a small bowl, combine gelatin powder with ¼ cup of heavy cream. Stir briefly and set aside for several minutes to allow the gelatin to bloom and soften.
Heat the Cream Mixture – In a medium saucepan over medium-low heat, combine remaining heavy cream, powdered sweetener, cocoa powder, and salt. Stir constantly for about five minutes. Watch for the sweetener and cocoa to dissolve completely and tiny bubbles to form around the pan edges.
Combine and Chill – Remove the pan from heat immediately when bubbles appear. Stir in vanilla extract and the bloomed gelatin mixture, whisking until the gelatin dissolves completely into the hot cream. Allow this mixture to rest at room temperature briefly, then refrigerate for at least 30 minutes until it thickens to pudding consistency.
Preparing the Cream Cheese Layer
Beat Cream Cheese – In a large bowl using an electric mixer, beat the softened cream cheese and powdered sweetener together on medium speed for two to three minutes. The mixture should become light, fluffy, and completely smooth with no lumps.
Add Cream – Pour in the room-temperature heavy cream and vanilla extract. Continue beating until the mixture becomes smooth, creamy, and well combined—about one to two minutes more.
Spread Over Crust – Once your crust has cooled completely, spread this cream cheese mixture evenly over the top using an offset spatula. Place the pan in the refrigerator while you prepare the whipped cream topping.
Making the Whipped Cream Topping
Chill Equipment – For best results, place your mixing bowl and beaters in the freezer for 10 minutes before whipping cream. Cold equipment helps cream whip faster and more stable.
Whip to Perfection – Pour cold heavy cream, powdered sweetener, and vanilla extract into the chilled bowl. Begin beating on low speed, gradually increasing to medium-high. Watch carefully—the cream will thicken in about 90 seconds to two minutes. Continue beating until stiff peaks form, meaning peaks hold their shape when beaters are lifted.
Final Assembly
Layer the Pudding – Remove your pan from the refrigerator. Pour the chilled chocolate pudding over the cream cheese layer, spreading it evenly with a spatula to create a smooth surface.
Top with Whipped Cream – Spread or pipe the whipped cream over the pudding layer. For elegant presentation, use a piping bag with a star tip to create decorative swirls, or simply spread smooth with a spatula.
Garnish Beautifully – Sprinkle chocolate shavings over the whipped cream, dust lightly with cocoa powder, or add your preferred toppings.
Final Chill – Refrigerate the assembled dessert for at least one hour, though two to three hours produces even better results as the layers set completely.
Essential Tips for Outstanding Results
Don’t Skip Parchment Paper – Lining your pan ensures effortless removal and clean slicing. The overhang acts as handles for lifting the entire dessert out.
Room Temperature Matters – Softened cream cheese blends smoothly without lumps. Let it sit at room temperature for 30-60 minutes before using.
Adequate Chilling Time – Allow at least 2-3 hours for the dessert to set properly. This patience produces clean, beautiful slices that showcase each distinct layer.
Even Layer Distribution – Take time to spread each layer uniformly. This creates an impressive visual presentation and ensures every bite contains all components.
Quality Ingredients Count – Premium cocoa powder, high-quality sweeteners, and fresh cream dramatically impact the final result. Don’t compromise on ingredient quality.
Sharp Knife, Clean Cuts – Use a sharp knife dipped in hot water and wiped clean between each cut. This technique produces neat slices with pristine layers.
Creative Serving Suggestions
Transform this already spectacular dessert into something even more memorable with these serving ideas:
Caramel Drizzle – Top individual slices with sugar-free caramel sauce for extra indulgence.
Berry Beautiful – Replace chocolate shavings with fresh raspberries, strawberries, or blueberries for fruity contrast.
Nutty Crunch – Sprinkle chopped pecans, walnuts, or almonds over the whipped cream for added texture.
Coffee Pairing – Serve alongside rich espresso or strong coffee—the bitter notes complement the chocolate beautifully.
Storage Guidelines
Refrigeration – Cover the pan tightly with plastic wrap or aluminum foil and store in the refrigerator for up to five days. The dessert actually improves after a day as flavors meld.
Freezing – This dessert freezes exceptionally well! Slice into individual portions, place on a parchment-lined sheet pan, and freeze until solid. Wrap each slice tightly in plastic wrap, then store in a freezer-safe container for up to two months. Thaw in the refrigerator before serving.
Frequently Asked Questions
Is this suitable for diabetics?
Yes! This sugar-free dessert uses low-glycemic sweeteners that don’t spike blood sugar. However, portion control remains important, and individuals should consult their healthcare providers about incorporating treats into their meal plans.
Can I make this vegan?
Absolutely! Substitute cashew or almond-based cream cheese for dairy cream cheese, use coconut cream instead of heavy cream, and replace butter with coconut oil. The texture will vary slightly but remains delicious.
What about different pudding flavors?
Certainly! Replace the chocolate pudding with vanilla, butterscotch, or any sugar-free pudding flavor you prefer. Each variation creates a completely different dessert experience.
Can I use different crust options?
Yes! Try coconut flour crust, walnut flour crust, or even a chocolate cookie crust made from sugar-free cookies. Each option brings unique flavor and texture.
How do I slice this neatly?
Use a sharp knife dipped in hot water, wiping it completely clean between each cut. This prevents dragging layers and creates pristine slices.
Nutritional Benefits
Despite its indulgent nature, this dessert provides surprising nutritional benefits when enjoyed as part of a balanced diet:
Healthy Fats – Heavy cream and almond flour provide satiating healthy fats
Moderate Protein – Cream cheese and cream contribute quality protein
Low Net Carbs – Only 7g net carbs per serving keeps you in ketosis
No Blood Sugar Spikes – Sugar-free sweeteners prevent glucose fluctuations
Antioxidants – Quality cocoa powder contains beneficial antioxidants
Final Thoughts
This sugar-free layered dessert proves definitively that healthy eating never requires sacrifice. The combination of crunchy chocolate crust, creamy filling, rich pudding, and fluffy topping creates an experience that rivals—and arguably surpasses—traditional high-sugar versions. Whether you follow a ketogenic lifestyle, manage diabetes, or simply seek healthier dessert options, this recipe delivers satisfaction without compromise.
The make-ahead nature eliminates stress when entertaining, while the stunning presentation guarantees compliments. Once you serve this dessert and witness everyone’s delight, it will become a treasured recipe you return to repeatedly. The best part? Knowing you’re providing genuine indulgence that supports rather than sabotages health goals.
Make this spectacular dessert for your next gathering and prepare for requests for the recipe. The combination of impressive appearance, incredible taste, and guilt-free enjoyment creates the perfect trifecta that defines truly great dessert!
ADVERTISEMENT
See next page:
ADVERTISEMENT
